.gif?height=120&name=purpleandgreen%20(Mobile).gif)
To provide a standardized process for importing new employee records into isolved during implementation, ensuring accuracy, consistency, and compliance with system requirements.
Be sure that there are no spaces in headers for employee import.
- The employee number is required for all employee imports and is the consistent required field for new hires as well as employee updates. Other types of imports (direct deposit, prior balances, etc.) can use either employee number, SSN, or time clock ID.
- Multiple companies/pay groups under the same main Client ID can be imported on same file. Be sure to include a column header of Legal and Pay Group if there are multiple pay groups for the legal.
- See tips for Excel in the article titled Data Imports – Tips and Tricks.
A. Preparing the File
-
Use the most recent Data Conversion Master template located in the University Library under Tax and Import Resources.
-
Verify file formatting:
-
Ensure no spaces exist in the column headers.
-
Employee Number is required for all employee imports.
-
For multi-company or multi-pay group clients, include Legal and Pay Group column headers.
-
Confirm all required fields (First Name, Last Name, SSN, Hire Date, Pay Rate, etc.) are completed.
-
-
For formatting assistance, refer to Data Imports – Tips and Tricks.
-
Save the file in Excel (.xlsx) format and label it clearly:
ClientName_NewHireImport_Date.xlsx
B. Importing the File
-
Log in to isolved.
-
Navigate to Conversion Management → Data Imports.
-
Under Import Type, select Employee Import.
-
In the Employee Import Mode, select New Hire Only.
-
Click Next on the action bar.
-
A loading message will appear before you are redirected to the Import Validation Summary page.

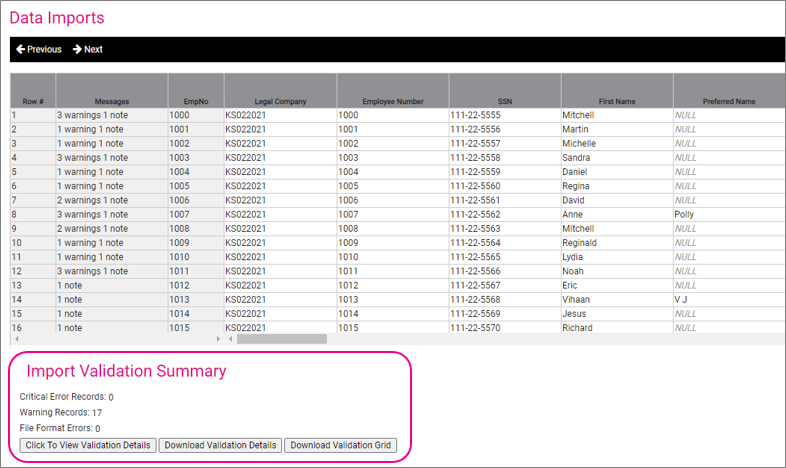
C. Reviewing Import Validation Summary
Review the validation results carefully before proceeding.
1. Critical Error Records
-
These stop the import from proceeding.
-
Review the file for missing or incorrect information and correct the indicated fields.
-
Examples: missing required headers, invalid SSN, missing employee number.
2. Warning Records
-
While not always fatal, all warnings must be reviewed before continuing.
-
Acceptable warnings may include:
-
Organization field or job doesn’t exist (system will add automatically).
-
A geocode warning where the system uses a default value.
-
-
Unacceptable warnings (require correction):
-
Column not recognized or ignored.
-
Invalid data formatting in key fields.
-
3. File Format Errors
-
These occur when required columns are missing or improperly labeled.
-
Example: “Employee Number” column is present but not formatted correctly.
-
Correct the column format and reimport the file.
 D. Completing the Import
-
After all errors and warnings have been reviewed and resolved, click Next at the top of the page.
-
Wait for the Import Summary to display.
-
Verify that the summary confirms successful import of all employee records.
-
Save a copy of the Import Summary for audit records.
-
-
Archive the import file in the client’s SharePoint folder under:
Client Folder → Employees.
-
Review the employee data within isolved:
-
Navigate to Employee Management → Employee Maintenance → General.
-
Confirm each employee’s information (name, hire date, SSN, pay rate, department, and location) matches the import file.
-
-
Verify employee status and active records are displaying correctly.
-
Once confirmed, mark import completion in HubSpot Implementation Ticket under the appropriate task.
Key Notes
-
Always use the most recent Data Conversion Master template to ensure compatibility with current system fields.
-
Never modify or delete required template columns.
-
If errors persist, contact the Implementation Manager before reimporting.
See the Employee Import Template below.
-
-